HTML Image Maps
HTML image maps are images that include clickable areas that link to different URLs.
How to Create an Image Map
An image map can be created manually, within and HTML editor, online or using an image map editor. In this tutorial, we will focus on how to create your own image map. It’s much easier than you may think.
Image
To create an image map, you will first need to create or select an image to use and decide which portions of the image you’d like to make clickable. These clickable areas, also referred to as hot spots, may be rectangles, polygons or circles.
Coordinates
Your next step will be to determine the coordinates of the hot spots within the image. This can be done manually or you can use an online service or a software program to assist you.
To search for an online image mapping service, search for ‘create image map online’ at your favorite search engine. To search for a software program, search for ‘image map editor.’
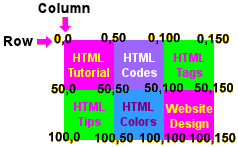
If you’d like to create an image map yourself, it’s really not hard. Following is an example image that is 150×100 pixels. The rows and columns have been marked with coordinates measured in pixels, which simply place the areas in the proper position. The first number is the row and the second number is the column.
Determining Coordinates
Most image editors will display the coordinates of your image when you place your pointer over an area. In the above example, if you were to open this image within an graphics editor, and place your pointer in the top left corner of the ‘Frames’ section of the image, the coordinates would be x:0 y:0. If you then were to drag your pointer to the bottom right portion of the area, the coordinates would be x:50 y:50. You should see these numbers displayed in the status bar at the bottom of the screen. For the above example, the coordinates would be written like this: 0,0,50,50.
Hot Spots
The clickable areas within an image map are commonly referred to as hot spots. These hot spots may be in the shape of the following:
Rect – Hot spot may be in the shape of a rectangle or any 4 sided shape.
Poly – Hot spot may be in the shape of a polygon or any multi-sided shape.
Circle – Hot spot may be in the shape of a circle.
Rect
To create a rectangle hot spot, you will need the coordinates for the top, left and bottom, right corner.
Poly
To create a polygon hot spot, you will need the coordinates of each point in order. For example, if your shape has six sides, you will only need to include the coordinates for 6 points starting with one specific point and then working your way around the shape.
Circle
To create a circle hot spot, you will only need two coordinates – the center and the radius, which is half of the diameter of the circle.
HTML Image Map Code
Once you have your image and your coordinates, your next step will be to place your image map into your web page. You will begin by adding your image:
<img src="imagemap.gif" usemap="#mymap" width="image width" height="image height" border="0">
To place the map within your page, include the map tag and a name for your map.
<map name="mymap">
Next, you will need to include your hot spots and the URLs in which the hot spots lead to:
<area shape="rect" coords="0,0,50,50" href=" html-tutorial.html">
<area shape="rect" coords="50,0,100,50" href=" html-codes.html">
<area shape="rect" coords="100,0,150,50" href=" html-tags.html">
<area shape="rect" coords="0,50,50,100" href=" html-tips.html">
<area shape="rect" coords="50,50,100,100" href=" html-colors.html">
<area shape="rect" coords="100,50,150,100" href=" website-design.html">
And finally, you will need to close the map.
</map>
Here is how the code might look:
<img src="imagemap.gif" usemap="#imagemap" width="150" height="100" border="0">
<map name="imagemap">
<area shape="rect" coords="0,0,50,50" href="html-tutorial.html">
<area shape="rect" coords="50,0,100,50" href="html-codes.html">
<area shape="rect" coords="100,0,150,50" href="html-tags.html">
<area shape="rect" coords="0,50,50,100" href="html-tips.html">
<area shape="rect" coords="50,50,100,100" href="html-color-codes.html">
<area shape="rect" coords="100,50,150,100" href="web-design-course.html">
</map>
Edit the text indicated in bold to suit your needs.
imagemap.gif
Should be the name of your image and lead to the image on your web server.
mymap
The name of your image map.
image width
The width of your image.
image height
The height of your image.
rect
The shape of your hot spot – rect, poly or circle.
0,0,50,50…
The coordinates of your hot spot.
frames.html…
The URL of your hot spot. This may be a page on your website or another website. If you are linking to another website, you will need to include the complete URL beginning with http://.
Here’s how the map will look:
Conclusion
Although image maps aren’t difficult to create if you have the right tools, they can be confusing. To save yourself some time and trouble, you may want to create your HTML image map within an HTML editor, online or use an image map editor.
This concludes the HTML Image Maps section. For additional tips and codes, visit the HTML Entities section.